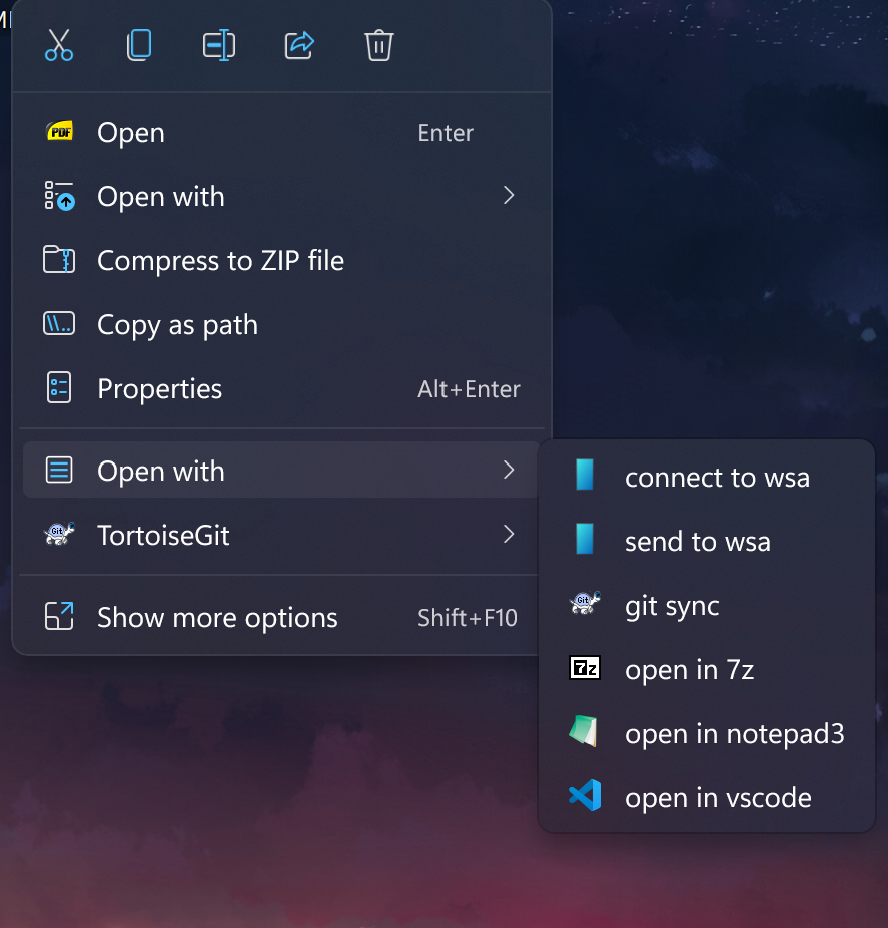
Experience .Net Apps quickly and easily with the help of WinUICommunity, Everything you need to develop an application is gathered in one place.
Add Custom Context Menu For Windows 11, We use the following project to create menus https://github.com/ikas-mc/ContextMenuForWindows11
Therefore, make sure that your app is a Packaged Application and not a UnPackaged.
You can use WinUICommunity.ContextMenuExtensions in any .Net >= 8.0 apps which supports Package Identity. this means you can use it in WPF or WinForm with MSIX Packaging.
Download and Install
| Nuget | Github |
|---|---|
| WinUICommunity.ContextMenuExtensions | Github |
1 | Install-Package WinUICommunity.ContextMenuExtensions |
After installing, add the following codes to Package.appxmanifest
1 | xmlns:com="http://schemas.microsoft.com/appx/manifest/com/windows10" |
- Replace
YOUR_APPNAMEwith your applications name. (for exampleApp.exe) - Replace All
YOUR_GUIDwith your GUID.(19E348CC-C459-4103-8415-ACB13961B26A) Follow the instructions below to create a new guide.
drive menu support (windows 11 22621+)
How to Create GUID?
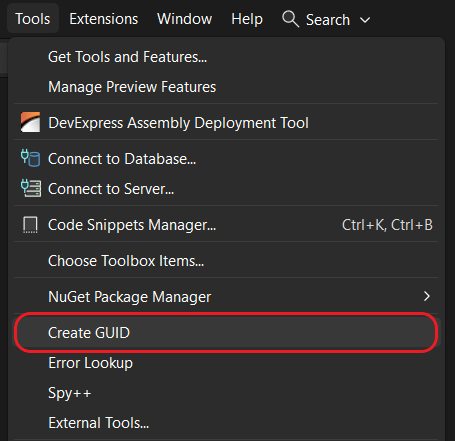
- 1.Open Visual Studio
- 2.From
Toolsmenu SelectCreate GUIDoption
- 3.Click
New GUID, then Change GUID Format toRegistry Formatand Finally Click onCopy
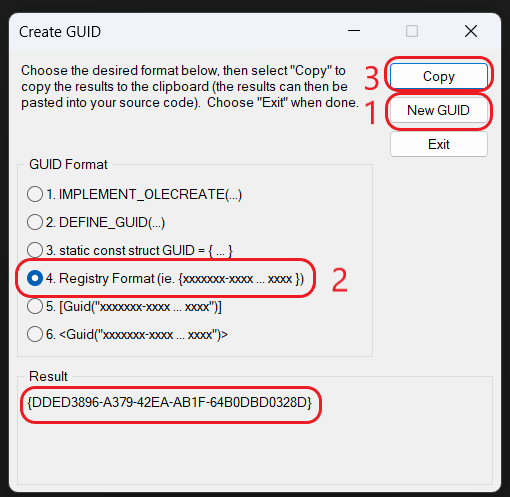
Note that the created GUID is surrounded by { and }. We don’t need them, so you have to delete them.
for example:
Change this{DDED3896-A379-42EA-AB1F-64B0DBD0328D}
to this:DDED3896-A379-42EA-AB1F-64B0DBD0328D
Attributes
| Name | Remark |
|---|---|
| File | |
| FileName | |
| Enabled | |
| Title | |
| Exe | |
| Param | |
| Icon | |
| IconDark | |
| AcceptDirectory | |
| AcceptDirectoryFlag | |
| AcceptFile | |
| AcceptFileFlag | |
| AcceptExts | |
| AcceptFileRegex | |
| AcceptMultipleFilesFlag | |
| PathDelimiter | |
| ParamForMultipleFiles | |
| Index | |
| ShowWindowFlag | |
| WorkingDirectory |
Methods
| Name |
|---|
| QueryAllAsync |
| GetMenusFolderAsync |
| SaveAsync |
| ReadAsync |
| RenameMenuFile |
| DeleteAsync |
| IsEnabled |
| EnableAsync |
| BuildToCacheAsync |
| ClearCache |
| ConvertMenuFromJson |
| ConvertMenuToJson |
| OpenMenusFolderAsync |
| OpenMenuFileAsync |
| GetCustomMenuName |
| SetCustomMenuName |
| ClearAllMenus |
| ReplaceMenu |
| RefreshMenuAsync |
| CheckMenuExistsAsync |
Create a New Menu
Open Your App.xaml.cs file and in your OnLaunched method, Create a new ContextMenuItem.
1 |
|
- Replace
YOUR_APPNAMEwith your applications name. (for exampleApp.exe) - Replace
YOUR_MENU_TITLEwith your menu title. (for exampleOpen App Here)
Config menu for Specific Extension
make sure your Type is set to *
1 | <desktop5:ItemType Type="*"> |
then you need to change AcceptFileFlag and AcceptExts
1 | AcceptFileFlag = (int)FileMatchFlagEnum.ExtList, |
Fix Some Issues
- if you dont see any menu items, make sure that the
ContextMenuCustomHost.dllfile is copied next to the executable file.
We will do this by default and you don’t need to do anything, but if you have a problem, First of all, make sure that theContextMenuCustomHost.dllfile is copied next to the executable file. - Restart
Explorer.exeprocess
Set Custom Menu Name
If you have several menus, they will be created as sub-menus, Therefore, you can change the name of the main menu with the following code
1 | menuService.SetCustomMenuName("MyApp Main Menu"); |
Examples
there is a lot of examples here, take a look here to see how properties can be filled.
More Deatils
see here for more details.